Tips & Techniques

Tips & Techniques: How to Cure Your Own Bacon

How to Make Bacon

With a little patience and just a handful of ingredients, you could be enjoying your very own home made bacon at a fraction of the price that you're paying for the store bought stuff. The best part? The endless options for customizing your bacon. But lets start with the basics. Read on, if you're ready to take your bacon to the next level!


Basic Bacon Cure


Ingredients


  • 3 - 5 lb slab pork belly

  • 4 oz kosher salt

  • 2 oz granulated white sugar

  • 1 oz brown sugar

  • 1/2 oz LEM Cure

  • 1 tbsp whole black peppercorns

[display_magento_products]

Instructions


Crush the black peppercorns under a heavy skillet. Combine all other cure ingredients in a bowl and mix well. Place the pork belly in a large zip top bag. Add about 1/2 cup of the cure mixture to the bag, just enough to coat all surfaces. Rub the cure all over the belly. Remove the air from the bag and seal. Place in the refrigerator for 7 days, turning and massaging the contents of the bag every day. After 7 days the thickest part of the belly should be firm to the touch, and fully cured.

Remove your bacon from the bag. Rinse well with cold water and pat dry with paper towels. Preheat your Yoder Smokers YS640 pellet grill to 200ºF. Smoke the bacon until the internal temperature reaches 150ºF. Remove from the smoker and cool to room temperature. Store in the refrigerator.
How to cure your own bacon

Our basic bacon cure consists of a few quality ingredients, including FRESH CRACKED black pepper. Yeah, the fresh cracked part is important!

How to cure your own bacon

In addition to the work it does in the curing process, LEM Cure (Prague powder #1) gives your bacon that nice pink color.

How to cure your own bacon

You might be surprised how little of the cure solution is needed to cure the belly. We're not packing it all around, forming a thick layer. Just be sure to cover all surfaces, and every day or two turn the belly over, massaging (from the outside of the bag) the liquid into the meat.

How to cure your own bacon

After a week of curing in the bag, we removed the belly, rinsed everything off the surface and placed it on a wire rack in the refrigerator, overnight. This allows the pellicle to form. The pellicle is layer of protein that is formed on the surface as the bacon dries. It allows for better smoke absorption. The next day, we smoked the belly at 200ºF until the internal temperature reached 150ºF and chilled it back down before cutting our slices.

How to cure your own bacon

How to cure your own bacon

Video: Smoked Beef Bourguignonne

[responsive_youtube FA-5Mf4DSQg]

What sets this meal off is the smoked chuck roast, which adds a nice smokey flavor to the final dish


Smoked Beef Bourguignonne Recipe


Yield: 12 servings

Ingredients


[display_magento_products]

Instructions


Preheat your Yoder Smokers YS480 to 250ºF. Inject the chuck roast with Butcher BBQ Prime Dust. Pat the outside of the roast mostly dry with paper towels. Season the roast with Cattleman’s Grill Tri-tip Seasoning. Smoke until the internal temperature reaches about 150ºF, about 90 minutes.

Remove the roast from the cooker and place a Lodge Logic 7 Quart Dutch Oven on the grate to preheat. Turn the cooker up to 400ºF. Rest 10 minutes. Cut the roast into 2” cubes.

Place about one tablespoon of oil in the dutch oven. Add the quartered mushrooms and sliced onions to the pan. Cook for about 10 minutes, stirring occasionally, until the onions are translucent. Add the garlic and tomatoes. Cook another 5-10 minutes.

Add the cubed beef, bay leaf, thyme, stock and wine. Braise the beef until very tender (about 210ºF internal temperature), and the liquid is reduced by over half, about 2 hours.

Serve the Beef Bourguignon topped with the minced fresh parsley.

Video: Pulled Pork Sandwich Recipe

[responsive_youtube nxac5RWaCgE]
Chef Tom creates a take on the classic pulled pork sandwich with an amazing apple slaw to pair with the pork all piled up on ciabatta buns.


Pulled Pork Sandwich Recipe


Ingredients


For the Slaw


[display_magento_products]

Instructions


Preheat your Yoder Smokers YS640 to 250ºF. Before beginning to trim the pork butt, feel around the roast and trim any small bone fragments or hard cartilage that may be left on the surface. Remove all of the fat cap to expose the meat. Flip the butt over and trim any excess fat on the surface. Find the seam near the bone side. Begin to pull the crevice open and carefully cut in-between the two muscles. Trim the excess fat, connective tissue and anything that is not meat from the inside of the opening.

Inject the butt with Smoke on Wheels Pork Injection & Marinade inserting the needle every couple of inches in a grid pattern. After inserting the needle, move it around a bit to create a pocket and fill the pocket with injection until it begins to come back out.

Pat the surface of the roast mostly dry with paper towels. Shake on a generous layer of Plowboys BBQ Yardbird Rub on all surfaces, including inside the crevice where you trimmed the fat and tissue earlier. Allow the rub to soak in to the meat at least 10 minutes before transferring to the cooker.

Place the butt on the grate of the smoker. Smoke until it has achieved a nice mahogany color on the outside, about 4 hours, or roughly 155ºF internal temperature.

As the pork cooks, combine the slaw ingredients, mix well and store in the refrigerator.

Remove from the pit and place the roast on top of two sheets of foil, large enough to wrap the roast. Pour a few more tablespoons of your injection liquid on the meat and tightly double wrap in foil. Return to the cooker, increasing the cooking temperature to 300ºF.

Continue to cook the pork butt until the internal temperature reaches roughly 205ºF, about 2 more hours. When the shoulder blade bone can easily be pulled out of the roast, the meat should be cooked enough to pull. Open the foil package slightly, and allow the roast to rest 20-30 minutes. During this time you can toast your ciabatta buns. Pull the meat, either by hand or using claws.

Warm equal parts Blues Hog Original BBQ Sauce and Blues Hog Tennessee Red BBQ Sauce in a sauce pan. Pour the mixture over the pulled pork and toss to incorporate.

Assemble the sandwiches: pulled pork on the bottom bun topped with slaw and the top bun.

Video: Bacon Explosion

[responsive_youtube 8akYdyuPzVU]

Chef Tom here with a great recipe for a bacon explosion.


Bacon Explosion Recipe


Ingredients


[display_magento_products]

Instructions


Preheat your Yoder Smokers YS640 to 275ºF. Place the sausage in a gallon zip-top bag. Press the sausage out into an even layer. Using scissors or a knife, cut along the edges of the bag and turn the layer of sausage out onto your work surface.

Season the surface of the sausage with R Butts R Smokin’ Ozark Heat BBQ Rub. Mix about 4 parts Chile Slinger Chipotle BBQ Sauce and 1 part Reida Honey Farm Raw Wildflower Honey. Warm the sauce to blend the two and make it a bit more fluid. Set aside half of the mixture and reserve for later use. Brush a layer of of the sauce mixture on the sausage. Spread the cheese and cooked diced bacon evenly over the surface. Roll the entire thing into a log.

Lay out 1/2 of your sliced bacon parallel to one another. Fold back every other slice (a couple of inches) on one side. Lay in a slice of bacon from the remaining 1/2 lb, perpendicular to the first layer of bacon, then fold the original slices back. Now working from the opposite end do the same thing, alternating the slices folded back, and adding another slice next to the last, forming a weave pattern with the bacon.

Place the sausage log at one end of the bacon weave and roll the sausage, encasing it in the bacon weave. Transfer to the cooker and smoke until the internal temperature reaches 150ºF, about 90 minutes. Brush the outside of the bacon explosion with the reserved sauce mixture and continue cooking until the internal temperature reaches 160ºF. Rest 10 minutes then slice to serve.

This recipe was prepared on a Yoder Smokers YS640 Pellet Grill.


Competition Chicken Thighs


[responsive_youtube Fi74kM76KuA]

Chef Tom breaks down our method of preparing competition chicken thighs. This is the recipe we use in KCBS competitions and incorporates tips, techniques and methods we have learned from competition barbecue pitmasters like Andy Groneman of Smoke on Wheels Competition BBQ (Kansas City) and "BBQ Brian" Misko of House of Q (British Columbia, Canada).


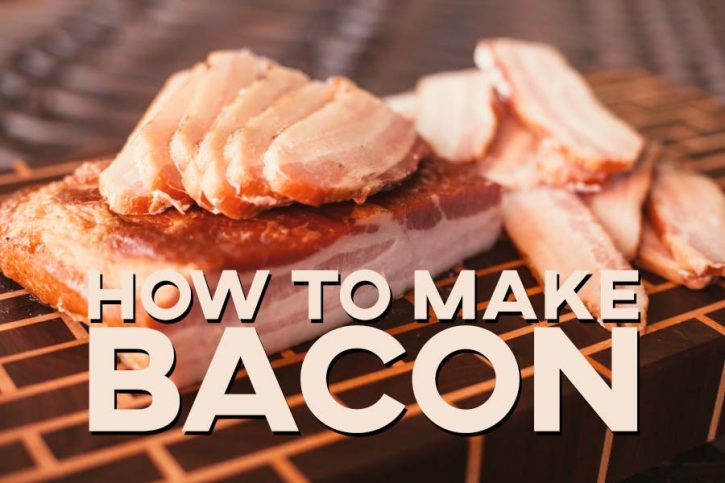
Competition BBQ Chicken Thighs Recipe


Ingredients


[display_magento_products]

Instructions


Remove the skin from the thigh. Place the skin on a cutting board with the outside of the skin touching the board, fat side up. Using a sharp boning knife slice the fat from the skin, taking care to not puncture the skin. The skin should be very thin when finished.

Looking at the backside of the thigh, you’ll notice that one end of the thigh bone has a rounded end that sticks out further than the other. Using poultry shears, cut the end of the bone off. You may need to slice around the end of the bone to get your shears in there. This should allow the flesh to cover the end of the bone, and keep the bone from protruding from the end, negatively affecting the shape of the finished product. Trim any excess fat from the meat of the thighs. Continue to trim any pieces of the flesh that will stick out or cause an uneven shaped thigh. You may need to go back and do more trimming as you assess the group of thighs as a whole. You want them all to be shaped and sized as evenly and similarly as possible.

Combine the Butcher BBQ Bird Booster Chipotle Chicken Injection with water (according to the directions on the bag) and mix well to dissolve. Using a marinade injector, inject the flesh of the thigh in several places. Place your thighs in a zip top bag with the remaining injection and soak for one hour. You do not need to soak the skins. Just wrap them in plastic wrap and store them in the refrigerator.

Preheat your Yoder Smokers YS640 Pellet Grill to 275ºF.

Remove the thighs from the bag and pat mostly dry with paper towels. Season all meat surfaces with Plowboys BBQ Yardbird Rub. Lay out your skins and lightly season the side that will make contact with the flesh. Carefully place the thigh on the skin and wrap the skin around the thigh, covering as much flesh as possible. Excess skin can be trimmed and/or tucked under the thigh. A little excess is good, as the skin will tighten as it cooks. Too much excess will negatively affect the bite.

Apply a layer of 
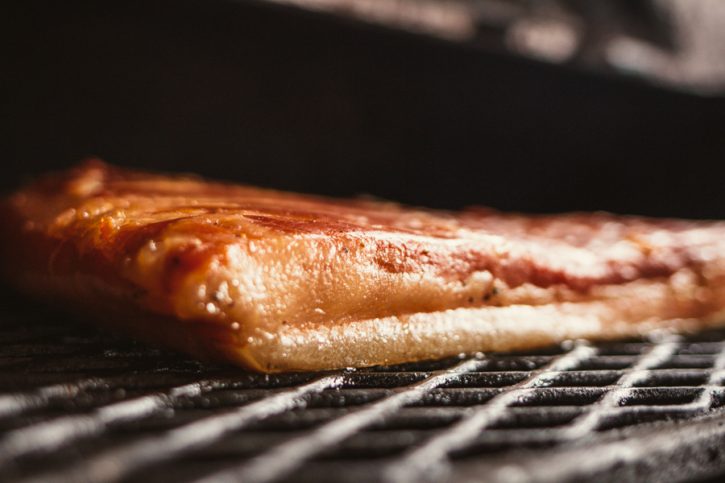
Butcher BBQ Grilling Oil Chipotle to the bottom of a foil pan. Carefully transfer the thighs to the pan, shaped and arranged as identically as possible with the skins precisely in place. Transfer the pan to the second shelf of the cooker and smoke for 30 minutes.

After the initial 30 minutes, cover the pan with foil, and continue cooking. At this point you can mix your sauce. Combine 2 parts Plowboys Sweet 180 BBQ Sauce, 2 parts Firebug Grilling Sauce Hot BBQ Sauce and 1 part Reida Honey Farm Wildflower Honey in a sauce pan. Stir to combine. Warm the sauce by placing the pan in the cooker.

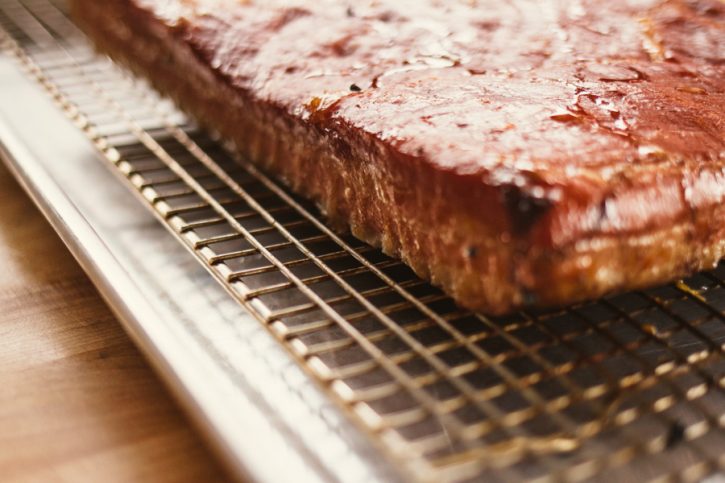
Using an instant read thermometer, like the Maverick PT-100, to monitor the internal temperature. When the thighs reach an internal temperature of 150ºF, remove the pan from the cooker. Place a wire glazing/cooling rack on the second shelf of the cooker. Carefully dip one thigh at a time in the sauce. Mind the skin, doing your best not to smudge the sauce as you remove it from the sauce. Transfer the thighs to the wire rack after dipping. Continue cooking until the internal temperature reaches 160ºF. Just before removing the thighs from the grill, lightly sprinkle the tops of the thighs with JP Custom Smoke Chicken Scratch Finishing Spice.

Remove from the cooker and store in a cooler or cambro until ready to box.

®2021 All Things Barbecue, LLC. All Rights Reserved